New River Indian Ruins
(Near New River, AZ)
We were pretty excited to visit this ruin as it was our first Arizona Ruin experience. We set out for the ruins at about 11:30 on a Saturday morning. The drive was easy--we took the freeway almost all the way there. After getting off I-17 at exit 236, we followed the dirt road as far as we could. Unfortunately, we don't have a high clearance vehicle (although this trip sure makes us want one) so our little Honda could only go so far on the dirt road. The road is pretty smooth except for where it crosses a stream--so after examining the streambed we parked our car and started hiking.
Hiking to the base of the mountain was easy as it was on a dirt road. Only one vehicle passed us on our way there. From the stream it took just under 50 minutes, but with a truck or Jeep you could easily drive right up to the base of the mountain. We weren't sure what we were going to have to climb, and we were rather surprised at the height of the mountain that we were going to have to scale.

Upon arriving to the small corral and the sign indicating entrance to the Tonto National Forest, we commenced in bushwhacking up the north side of the mountain. There is a barbed wire fence that defines the Tonto National Forest boundary. If you stay close to the fence, it will lead directly to the mountain summit. We bushwhacked up while staying on the east side of the fence. It may be easier to go up the east side of the mountain, but I'm not sure. There is no trail going up on either side. The west side has several small cliffs which make it a poor route.
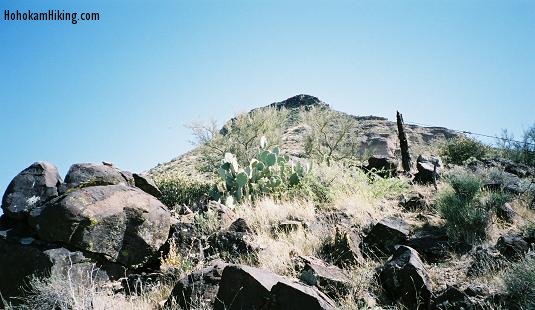
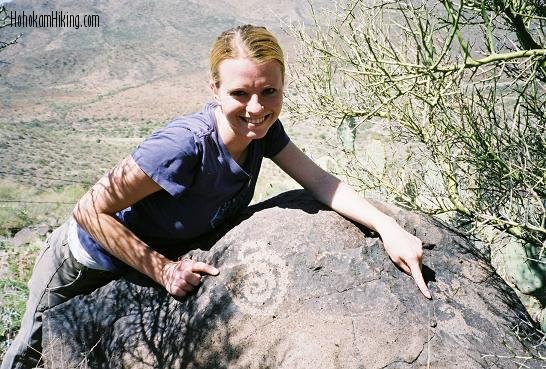
After climbing about 1/3 of the distance to the summit, we stopped to rest at a small peak. The fence passes directly over the peak--a large wooden post holds up the fence at that point. As we were resting, my wife spotted a well-defined spiral petroglyph on the large boulder which is on the peak. You can also find the shape of an animal on the boulder and some other markings. If you head a few yards east, there is another bigger boulder with some faint markings.
If you continue to follow the fence, it will take you downhill a bit to a small sandy saddle where you can see the first ruins, although they are not well preserved. You'll find a 8-10 foot rock wall that's 1 or 2 feet high. Supposedly there were several rooms in this area, although they are not easy to make out.
The mountain becomes a bit more steep and treacherous after this point. We continued following the fence until it ended at the small rock cliff surrounding the peak. At this point it is easiest to head around to the east side of the mountain where there is a pass through the cliff that is the easiest spot to get to the top. You'll notice that this spot leads through an ancient wall--it appears that this, the easiest spot to use to get to the summit, was well protected. We actually didn't find the path on the east until after we had scaled the cliff on the north side.
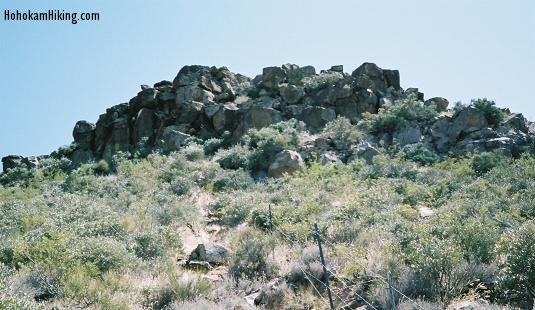
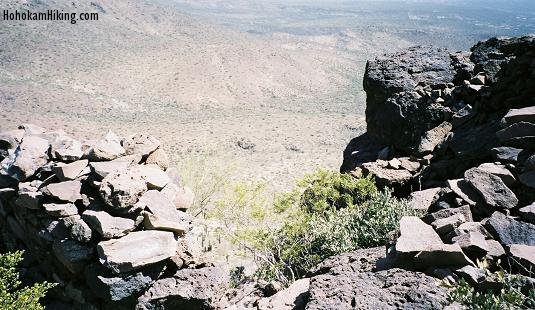
On top of the peak you'll find several well-defined rooms. The highest wall is around 4 feet tall and has a very definite entrance. From the peak you can see for miles towards the south and the whole area surrounding the mountain can be seen. My guess is that this ruin was used as a lookout for those living around the mountain.
Some petroglyphs can be seen on the rocks next to the entrance on the east side--although they may just be graffiti (there is graffiti all around them). Other petroglyphs can be found on the south side at the base of the peak, although they are hard to make out.
The way down the mountain is much harder than the way up. I slipped a couple of times and received a nice bruise on my rear.
When we were almost off the mountain and back on the road, my wife was swatting some bugs out of her face and her hand met a jumping cholla on the backswing. At first she thought that a cactus pod sticking out of her hand was funny, but then the pain kicked in. I had never tried removing a jumping cholla pod from human flesh before, so I wasn't sure what to do. First I tried just grabbing the end of the pod and pulling it away. As I did so the needles only tugged on my wife's skin and caused her more pain. Luckily I had some pliers on my knife, so we began trying to pull the needles out one by one, but since the needles were going every direction this wasn't very effective and might have even sent more needles into her palm. Finally I started cutting away the needles one by one with my knife. Once the pod was dislodged, we took the pliers and began yanking out the needles one by one until they were all out. Once the needles were out the pain stopped, but she was left with about 25 red prick marks. I've read since that the best way to remove the jumping cholla pods is with a comb, but I'm not sure I believe that. I think having some scissors to cut away the pod and then using pliers for the needles is the best method.
It took about 2 hours to hike to the summit and back down. Our hike back to the car was uneventful and took about 45 minutes. We did see a garter snake--the only snake we saw during the whole trip--and several ground squirrels. It was late April when we made the trip and we each drank a quart of water and wished we had brought more. Luckily the outlet malls in Anthem have a food court and cold Icees.